Workflow Assistants
Workflow assistants are an advanced form of AI assistants in AI-School. Instead of an open-ended conversation without a fixed structure, the user follows a defined sequence of steps guided by the AI. This makes it possible to automate complex, multi-step processes — such as a complete lesson from start to finish.
What is a Workflow Assistant?
A workflow assistant is built around a visual workflow of nodes connected by edges. Each node performs a specific task:
- Start / End — the entry and exit point of the workflow
- Evaluate — analyses the context and stores structured information in the workflow memory
- Condition — evaluates an expression and routes the flow in the right direction
- LLM — calls a language model for a specific task (optionally: waits for user input)
- Approval — asks a yes/no question and routes the flow based on the answer
- Pass-through — connects routes without an AI task or visible output, useful for keeping a workflow readable
- Subagent — runs the same task in parallel for multiple items
The workflow automatically saves its state after each step. When the user provides input, the workflow resumes exactly where it left off.
Creating a Workflow Assistant
Go to Assistants → New assistant and choose the type Workflow assistant. You can start from a blank canvas or choose one of the pre-configured presets.
Workflow assistants can be shared with groups and colleagues, just like regular assistants. When sharing with colleagues, AI-School can automatically send an email notification so recipients know the workflow assistant is available.
Global Settings
When creating or editing a workflow, the global settings panel configures options that apply to the entire workflow:
- Model: The AI model used by all steps. You select one model for the whole workflow.
- Tools: Which tools are available in the workflow (e.g. Recording, SLO Search, Internet Search). Enabled tools are available to all LLM steps unless disabled per step.
- MCP servers: External connections available in the workflow.
- Documents: Files that LLM steps can reference.
- Images: Images that LLM steps can use.
You can also control whether users are allowed to add their own files or images during the chat.
Per-Step Settings
Inside each LLM step you can disable tools, files, or images that were enabled globally. This gives fine-grained control over which resources are available at each step. You cannot add resources at step level that are not already enabled globally.
For most users, a preset is the best starting point. You can customise the preset to suit your own needs afterwards.
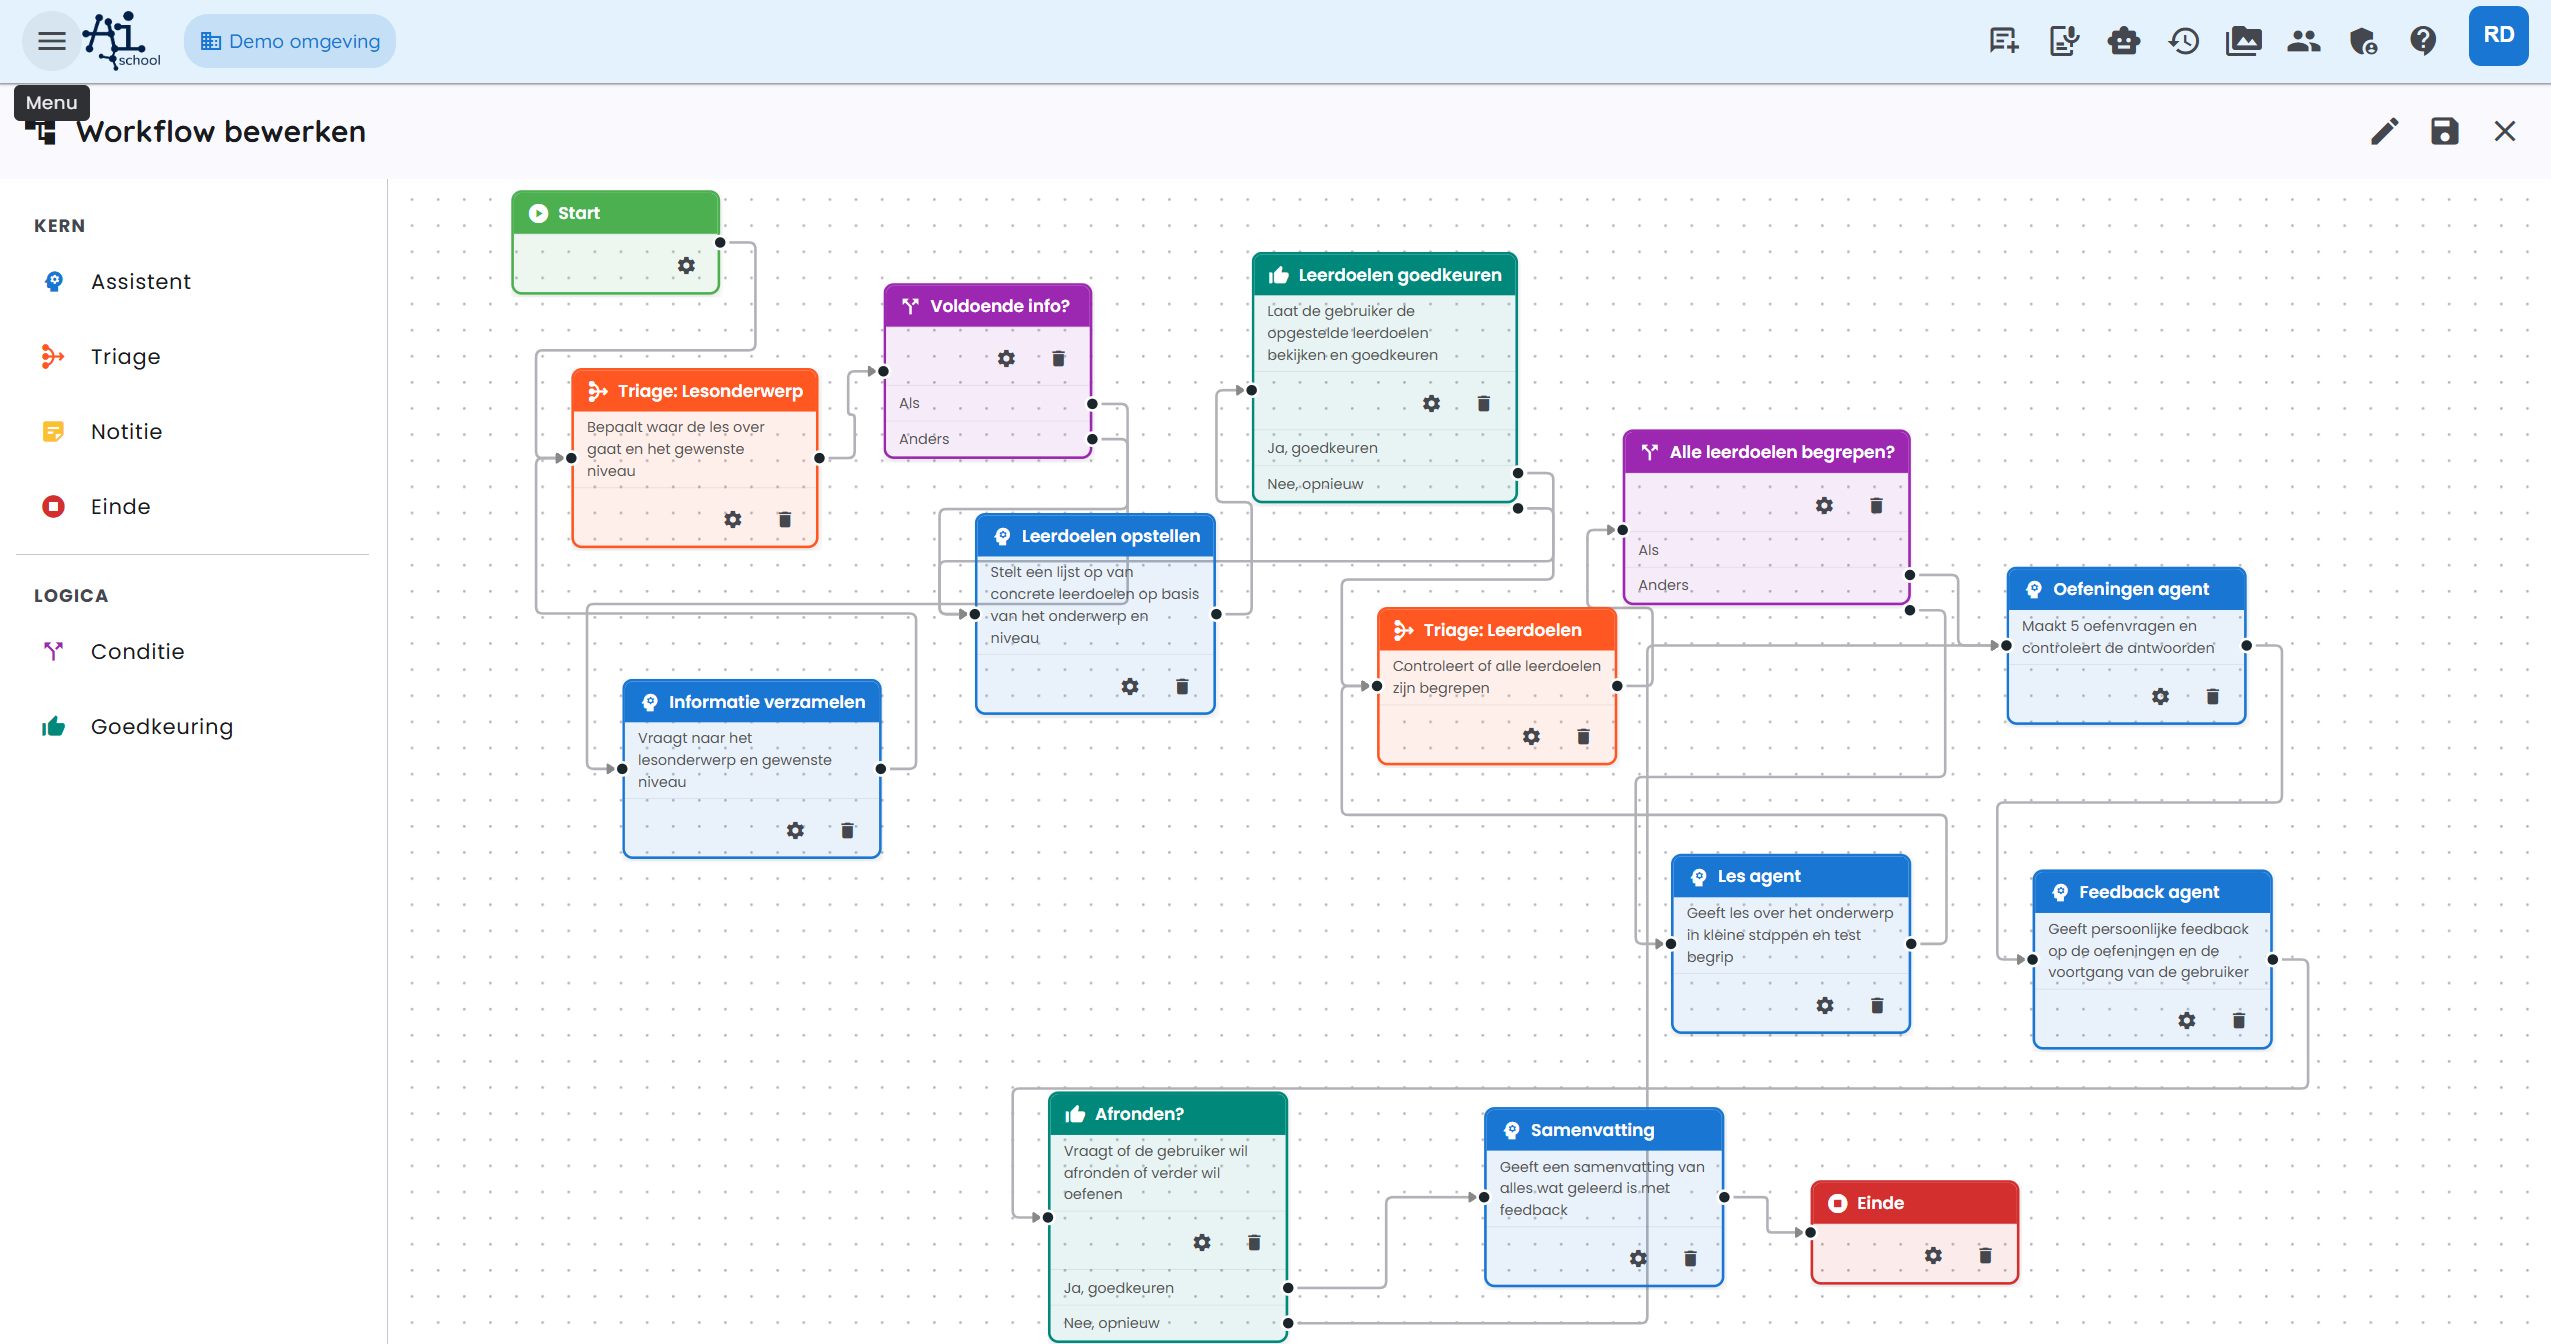
Example: the Lesson Assistant
The Lesson Assistant is a ready-to-use preset designed specifically for education. It guides the user from start to finish through a complete lesson: from determining the topic and level, through learning objectives and explanation, to exercises and a closing summary.
Workflow Overview
The Lesson Assistant consists of the following steps (nodes), in order:
Step by Step
1. Start
The workflow starts as soon as the user opens the chat and sends their first message.
2. Triage: Lesson Topic (evaluate node)
What does it do? The AI analyses the user's message and attempts to determine:
- Topic — what is the lesson about? (e.g. "lever law")
- Level — beginner, intermediate, or advanced?
- Enough info? — is there sufficient context to draft learning objectives directly?
The result is stored in the workflow memory.
3. Enough Info? (condition node)
If enough information is available (enough_info = true), the workflow proceeds directly to Draft learning objectives.
If information is missing, the workflow goes to Gather information.
4. Gather Information (LLM node, waits for input)
What does it do? The AI asks targeted questions to find out the topic and desired level. Once the user has responded, the flow returns to Triage: Lesson Topic to re-evaluate.
Example conversation:
🤖 "Great to have you here! To help you well, a few quick questions: 1. What topic would you like a lesson on? 2. What is your level? (beginner / intermediate / advanced)"
👤 "year 10 physics, lever law"
After this response, the triage re-evaluates and determines: enough_info = true.
5. Draft Learning Objectives (LLM node)
What does it do? The AI drafts a numbered list of up to 4–5 concrete, measurable learning objectives for the given topic and level.
Example output:
Learning objectives for Lever law – year 10 (intermediate):
- You can state the lever law and explain the formula F₁ × r₁ = F₂ × r₂.
- You can perform calculations to determine unknown forces or arm lengths.
- You can apply the lever law to practical examples (scissors, wheelbarrow, seesaw).
- You can explain the difference between a first-, second-, and third-class lever.
6. Approve Learning Objectives (approval node)
What does it do? The AI asks the user whether the drafted objectives are acceptable and whether the lesson can begin.
- Yes → proceed to the lesson
- No → return to Draft learning objectives to reformulate them
The user can view the learning objectives via the expandable menu in the chat.
7. Triage: Learning Objectives (evaluate node)
What does it do? After each lesson cycle, the AI checks whether the user has mastered all learning objectives. This is a strict evaluation: the user must demonstrably understand each objective.
8. All Objectives Understood? (condition node)
- Yes → proceed to Exercises agent
- No → proceed to Lesson agent for the next objective
9. Lesson Agent (LLM node, waits for input)
What does it do? The AI teaches the topic step by step, following the learning objectives. After each part, the AI asks a comprehension question. Only when the user demonstrates understanding does the lesson proceed.
After the user's input, the flow returns to Triage: Learning Objectives to evaluate progress.
Example:
🤖 "We start with objective 1: the lever law. A lever is a rigid rod that rotates around a pivot point. The force you need depends on the distance to the pivot. The formula is:
F₁ × r₁ = F₂ × r₂
Can you explain what r₁ and r₂ mean in this formula?"
10. Exercises Agent (LLM node, waits for input)
What does it do? The AI provides at least one practice question per learning objective. The user answers the questions, after which the flow proceeds to Feedback agent.
11. Feedback Agent (LLM node, waits for input)
What does it do? The AI gives detailed, personal feedback on the completed exercises. For each learning objective, it discusses what went well and where improvement is possible. The tone is honest but encouraging.
12. Wrap Up? (approval node)
The AI asks whether the user wants to wrap up or practise more.
- Yes → go to Summary
- No → return to Exercises agent for another round
13. Summary (LLM node)
What does it do? The AI gives a clear summary of all lesson content, followed by personal, motivating feedback on performance.
14. End
The workflow closes with an encouraging final message.
"Well done during this lesson — see you next time!"
Sample Conversation
A condensed example conversation with the Lesson Assistant on the lever law, year 10:
| Who | Message |
|---|---|
| 👤 User | hi |
| 🤖 Lesson assistant | Great to see you! What topic would you like a lesson on, and at what level? |
| 👤 User | year 10 physics, lever law |
| 🤖 Lesson assistant | Perfect! I've drafted 4 learning objectives. Would you like to start the lesson with these? |
| 👤 User | yes |
| 🤖 Lesson assistant | Let's start with objective 1: the lever law. (explanation + comprehension question) |
| 👤 User | (answer to comprehension question) |
| 🤖 Lesson assistant | (lesson continues for objectives 2, 3, 4 ...) |
| 🤖 Lesson assistant | You've completed all learning objectives! Time for exercises... |
| 👤 User | (answers to practice questions) |
| 🤖 Lesson assistant | (personal feedback) Would you like to wrap up or practise more? |
| 👤 User | wrap up |
| 🤖 Lesson assistant | (summary + motivating closing) |
Viewing Progress
While chatting with a workflow assistant, you can view workflow progress via the Workflow button to the right of the chat input. Clicking it opens a panel showing:
- All steps of the workflow (condition and note nodes are not shown)
- The status of each step:
- ⬜ Pending: Not yet reached
- 🔄 Active: Currently running
- ✅ Done: Completed successfully
- ⏸️ Awaiting input: Waiting for user response
- ⏭️ Skipped: Not executed (e.g. due to a condition)
- ❌ Error: An error occurred
Creating a Triage Node
An evaluate node (triage node) extracts information from the conversation and stores it in the workflow state. Condition nodes can then read those values to route the flow correctly.
Configuring
- Add an Evaluate node to the workflow.
- Write a system prompt describing what the AI should analyse and what conclusions it should draw.
- Define the output schema with fields:
- Field name: The key used to retrieve the value later (e.g.
enough_info,level,route). - Type:
string(text),number,boolean(yes/no), orenum(fixed set of values). Forenum, provide the allowed values separated by commas.
- Field name: The key used to retrieve the value later (e.g.
- Set max iterations to prevent the node from looping indefinitely.
Memory values
Values stored by the evaluate node are accessible using the state. prefix in condition nodes, for example state.enough_info or state.level.
Configuring a Condition Node
A condition node evaluates expressions based on the workflow memory and routes the flow to the correct next step.
Branches
A condition node has one or more branches:
- If: The first condition to evaluate.
- Else-if: Optional additional conditions.
- Else: The default route if no condition matches.
Writing Expressions
Expressions use CEL (Common Expression Language):
| Desired behaviour | Expression |
|---|---|
Field is true | state.enough_info == true |
| Field has a fixed value | state.level == "advanced" |
| Numeric comparison | state.score > 7 |
| Multiple conditions | state.level == "basic" && state.score < 5 |
Setting connections
Draw separate connections from the condition node for each branch to the correct next node. The editor shows a separate output handle per branch.
Using a Pass-through Node
A pass-through node does not run an AI task. It simply forwards the workflow to the next step. Use it when you want to bring multiple routes together neatly or when you need a technical routing step in the flowchart.
Common examples:
- connect a path that skips scripts to the step where images are selected
- let multiple approval routes continue into the same next step
- make a long workflow easier to read without using a note node as a connection point
A pass-through node must have at least one incoming and one outgoing connection. It is not shown as a separate content step in the workflow progress panel.
Recording in Workflows
The Recording tool (vastlegging) is especially useful in workflows. It lets the AI automatically save interim or final results as editable documents in the side panel.
Setting up
- Enable the Recording tool in the workflow global settings.
- Add an instruction in the system prompt of the desired LLM step to record specific content.
Example
In a learning-objectives step you might write in the system prompt:
“Draft learning objectives for the given topic and level. Then immediately save them using the Recording tool with the title ‘Learning Objectives’.”
Users can view recorded documents via the Recording button (📄) in the chat toolbar.
Restoring a Conversation
If you are in the middle of a lesson and want to go back to an earlier point, you can do so using the restore button (the history icon) on an earlier message. This removes all messages after that point and resumes the workflow from that exact moment.
Restoring is permanent — the deleted messages cannot be recovered.
Editing a Workflow
As an administrator, you can open and edit an existing workflow in the workflow editor. Click a node to change its configuration, add new nodes via the right-click menu, or drag connections to other nodes.
For a completely new workflow, you can start with a blank canvas or use a different preset.
Files and subagents in workflows
A workflow can ask the user to provide files, for example a source document, assessment model, contract, policy document or completed form. The user can upload a new file or select an existing file from file management. Files added through a workflow form become available to the assistant for that chat, but they are not automatically selected for ordinary chat questions.
New files are processed before the workflow can reliably continue. If a required file is still being processed or has failed, the user must wait or choose/upload the file again.
The Subagent node runs the same task for multiple items in parallel. Use it when a workflow needs to process a list, such as one document, participant, employee, client, case or form per run. The subagent receives the current item in an isolated context. Make prompts refer explicitly to the current item and avoid instructions that process multiple items at once.